When Tom was 9 months old we had Christmas in the USA. We'd been invited to go skiing/boarding with friends in San Francisco - it's not far from Lake Tahoe, a legendary resort which we'd be unlikely to visit otherwise. I had my reservations about the long-haul with 9mth old, but against my better judgement, and with sleep deprivation depriving me of my sanity, I said yes. So we flew out with a 6yr old Phoebe, 9mth old Tom, car seat, buggy and all related paraphenalia, on 23rd December.
Long story short, we met our friends, did the San Francisco thing, saw the Golden Gate Bridge, went up and down the hills, saw the shops and suffered horrible jet lag throughout so Christmas wasn't really the great success it should have been. Packed up on Boxing Day and drove to Tahoe for the snow and the skiing. That's another story, so we'll leave it for now.
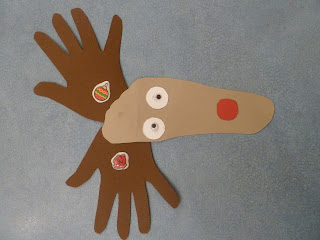
Whilst staying at our friend's house I noticed their charming Reindeer decorations which I demonstrate for you below. The lovely thing is, if you have children, you make them, display them, store them, and then next year retrieve them and compare the size they were to the new ones you make. Then repeat, until the kids are 13 or no longer tolerate the family tradition this becomes....
Purchase the following from your local art shop, scrapbooking shop, The Works, stationers or wherever:
- 2 or 3 sheets of different coloured brown/taupe/grey/Reindeer coloured stiff paper or thin card.
- 1 sheet of same quality in white and red
- PVA/art/paper Glue
- Woggly eyes (optional)
Choose which colour brown for the Reindeer face and which colour brown for the Reindeer antlers.
Draw around the child's hands on one colour and foot on another colour. Cut out the shapes. Assemble hand shapes at toe end of the foot shape and glue in place to resemble antlers.
Cut out 2 eyes in white, and 1 nose in red.
Glue in place. Add woogglly eyes if desired or draw 'black pupil' on freehand. Hey presto! Reindeer.
Sorry about the pictures, they uploaded out of sequence, but I'm sure you're clever enough to work out the correct order. No prizes only the self-satisfaction of knowing that you know....
I've not got time tonight to put into correct order as didn't have much sleep last night, poorly Tom, I spent the night on the floor in his room :(
Bless him, he'd rallied this afternoon, after some more Calpol and he wanted to do his Reindeer, and then set to embellishing it with stickers. There's no hard or fast rule to this, the joy of it is how different the Reindeer are and watching how the children approach the task each year...
Thanks for reading. Now, go and make some Reindeer yourselves and start your own traditions! Thanks to Mary in SF for her inspiration...... Kat.


No comments:
Post a Comment